By now, I’m assuming most of you have at least 2 track gears. If you don’t get some> READ THIS, > then come back here.
Track mechanics are very simple- you have a bike, no cables, and a fixed drivetrain. In theory, a gear change should be fairly straight forward. But, as with all new skills, it does take some time to master. I’ve done a quick gear change or two over my years. And I would like to share some top tips to either get you started with changing gears, or to make you more efficient between efforts.
Prep
- Superglue your chainring bolts. Do it! yes I know some brands hold when you change gears, yes I know there is a tool, yes blah blah blah… resale value. Just super glue them. This will hold your bolts in place and make changing the front chainring faster. You’ll also get the bonus of not dropping/losing a bolt during the change.
- Tools-

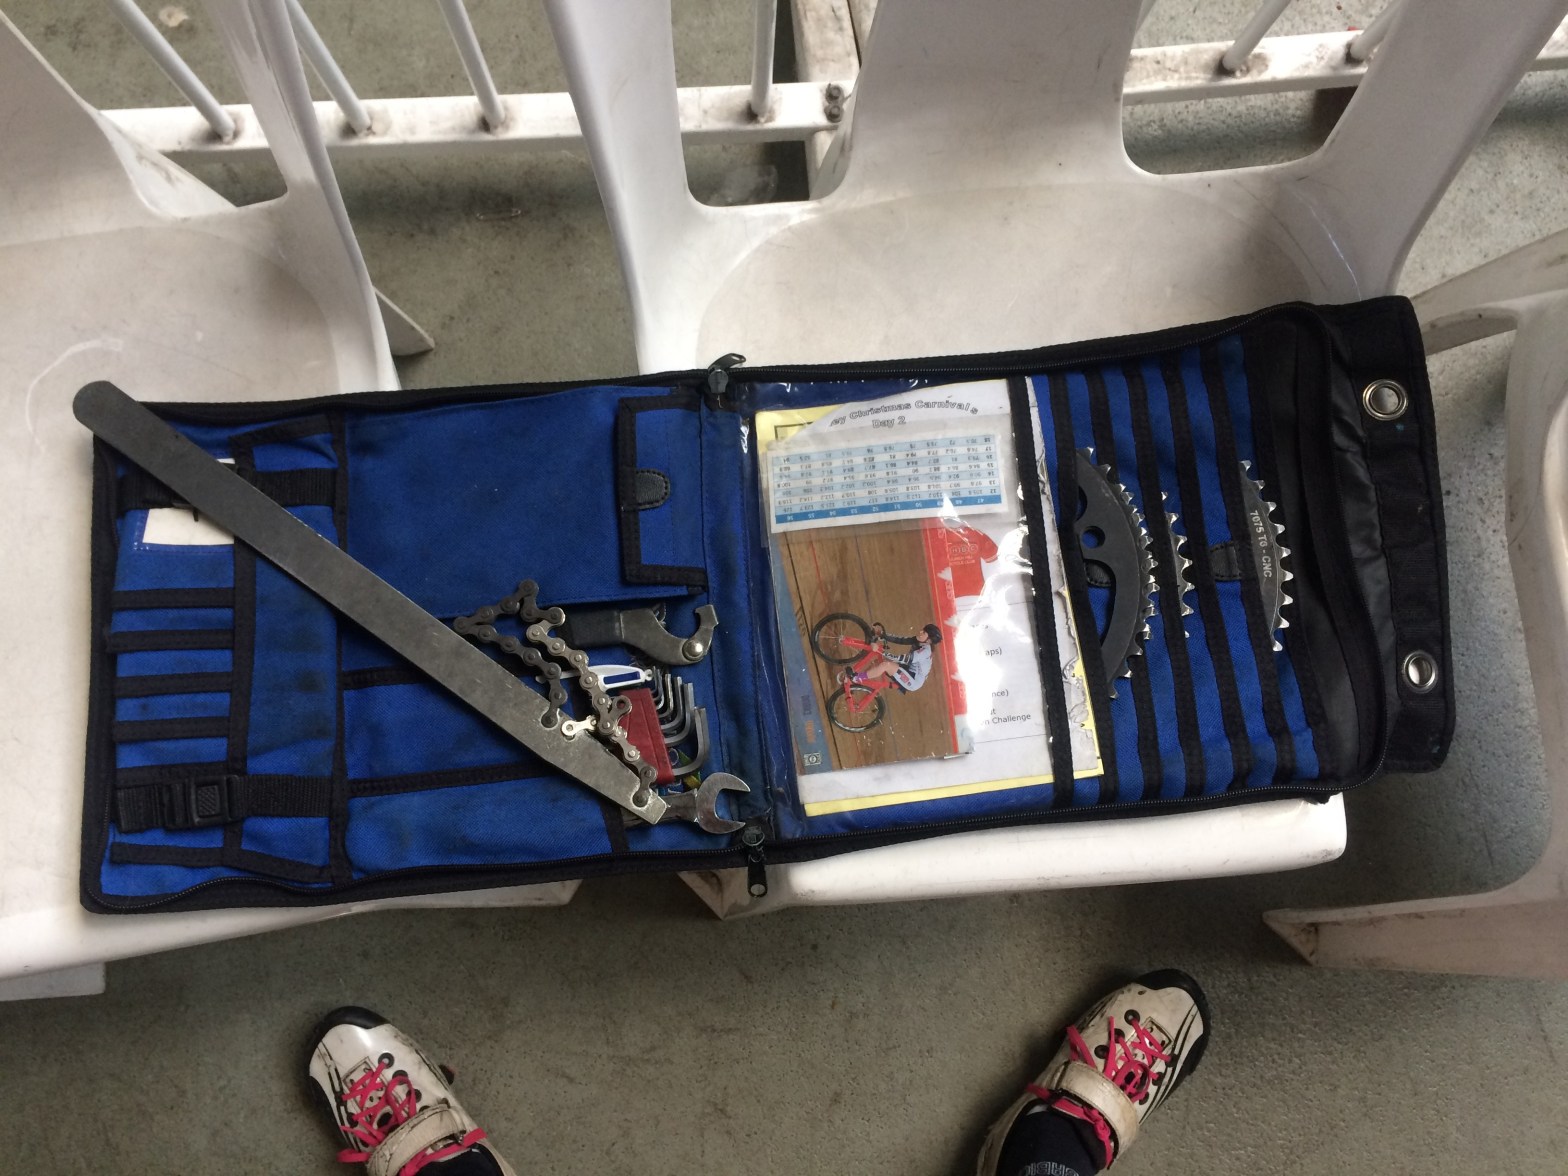
The inside of my tool Bag
* 15mm spanner! The only acceptable tool for working on track nuts
* 5mm allen key. Don’t use a multi tool. They are too fidgety
* Chain whip- get a good one
* Lockring removal tool- I’m a little on the fence with this one. I have an el-cheapo for when I do need to use it. I mainly don’t use a lockring because as a sprinter I change gears often, and don’t plan on stopping fast/skidding. But if you do use a lockring, it adds an extra step, make sure it’s a good one (not one that I have).

- very poor lockring tool
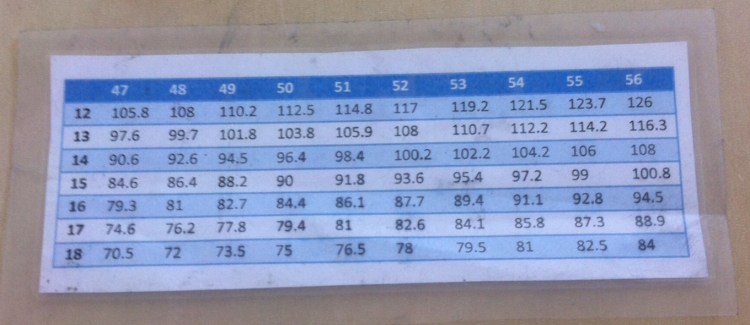
* Gear Chart- have a gear chart handy. Not the big chart of big gears, but one in table form with only the gears you own. (the big chart of big gears is handy, but when you don’t have all the combos, it makes finding the gears to work with a lot harder)
Before Training- Go over your program. Work out what gears you want to use. You want to consider a warm up gear, effort gears, and a skills gear with the least amount of gear changes. BUT, gear selection should not be based on laziness. This will require a bit of thinking and looking at a gear chart.
If you have a flip flop hub, choose 2 cogs. One for the warm up and skills, the other for the efforts. The next is chainring range. If you start with a 53T will you have enough additional chainrings to go up or down 10 inches. Will you have enough chain? If you are going up gears in the set and you only have a 48-54 chainrings, maybe drop the cog to one tooth smaller so you can start at the 48 and work your way up. I try to only change my cog once a session and get the main gear variation from chainring selection.
For example here is a strength night from last year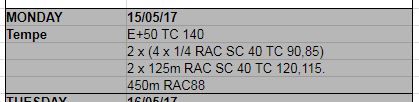
I’m pretty sure Carl was trying to kill me at this point. 12 efforts!
1 spinning, 2 sets of 4 heavy quarters, 2 sets of fast 125’s and an enduro spin of death just to make sure I was spent.
These are the gears for that session.
- Warm up 53/18 (rode to the track, pranced, did 10 laps chatting, two jump
- Effort 1 – Entry+50 Target cadence 140. 54/16
- Effort 2- rolling quarters- 54/15 set 1 55/15 set 2
- Effort 3- rolling 125’s – 55/15
- Death- 52/16
I chose my warm up gear by just using what I rode to the track. I have a street gear (18T) on my flip flop. From laziness I just run whatever is on my front with the 18 and use it on the road. I can fit anything from a 48T to 54T on the front and still have dropout/chain to move with. It gives me 72 to 81 inches, a perfect street/warm up gear.
From there I worked out my first two sets. I knew I had to hit 140 RPM in the first set and only 90 in the second. I knew I would hit around 60km/h for the entry and about 40km/h for the quarter (I looked at the session I did before, and compared efforts, gears, results, and riding conditions) This meant I could put on the 54/16 for the entry, and the 54/15 for the first set of quarters.
Between the warm up and efforts I had to change both the chainring and cog. But I would only I would need to change the cog for the second effort.
After the first set of quarters, I hit my target! Win! I chucked the 55 on. All I needed to change was the chainring for the next effort.
From there I looked at the 125’s. I needed to hit 12oRPM standing and 115 seated. I looked at the 55/15, then the big chart of big gears; 55km/h and 53km/h in about 1/3 of the track. Do-able, I decided to keep the gear as 55/15. (no gear change win!) But failed at the efforts, 117 and 114 RPM. Wrote that in my notebook. next time.
Final effort 88inches of death… had to change both the front and back (I don’t know where my 17T went) Otherwise I would have used the 55/17 (87 inches, close enough) and saved a double change. I could have used 49/15, but my chain tensioners don’t reach that long, and I prefer combo-ing big big.
Well I died, it sucked, Carl is trying to kill me. I don’t want to talk about it. 
Alright, now we have all the prep out of the way, lets change some gears.
Changing track gears is a simple process. But for anyone new to track or even new to bikes it can be a daunting task. It took me a while to master, but once o got a routine, rhythm and system in place, it became second nature and very quick.
Here we go
- Hang your bike up on a rail or lean on a sturdy wall.
- Grab all your tools and chain ring/cogs
-15mm spanner (never a shifter! For the love of god don’t use a shifter or pedal spanner!)
-5mm allen key
-Chain whip
-Lockring tool (optional)
loosen your nuts - With the 15mm loosen the rear nuts
- If you have them loosen the chain tensioner bolts

If you have tensioner bolts, I recommend you use them. This is pure opinion. I know many mechanics that hate them. But I find it makes getting it easier to get the right the chain tension. It also gives you some extra security for not pulling a wheel. You also won’t have to crank your nuts as hard (saving your nuts, drop outs, and axel)
Changing the chainring (if not go to the next section)
- ‘Crack’ all 5 bolts on your chainring using the short part of the allen key. This will give you maximum torque to do the initial loosen. Then with the long part, quickly spin to get the bolts out.

Crack with the short part 
Spin with the long part - Take the old chainring off (including the chain) rest the chain on the pedal (so it’s easier to pick up when putting back together)
- Put the new chain ring on
- Replace the bolts, skipping every other hole. By putting in every other bolt until all 5 bolts are replaced you get an even tension around the chainring eliminating the risk of the chainring being shifted slightly (some brands you get about 1mm of play in the drilled bolt holes).

Use the long part of the allen key and only go finger tight. - Tighten all the bolts (still alternating) with the short part of the allen key. Don’t crank super tight, but a firm push is perfect.
Changing the cog (if not go to the next section)
- Take the wheel out of the rear drops.
- **Optional** Remove the lock ring (ask me about the funny story I have staring my fiancé). To remove the lockring, put the wheel between your feet. In your left hand hold the tool and position it so that you are pushing down with your left hand to remove.

lockring on my commuter gear - ***to remember what way to take things on and off for a rear cog, I think a sweet skid removes a cog, and a standing start tightens it. The lockring is the opposite ***

- Remove the cog. Place the wheel between your feet (this acts as a block to give you something to push against. It also gives you a good grip) With the cog facing away from you, wrap the chain from the chain whip around the cog. You’ll want to wrap it so it won’t come undone when you push the chain whip. Right hand pushing down (see photo)
- Push down on the chain whip to do the initial loosen, then spin the cog off with your fingers.
- Grab the new cog and spin in onto the hub. Position the wheel between your feet again, and in the same motion, but opposite direction (left hand pushing down) Then tighten it with the chain whip with a firm push.
- If you must, put the lock ring back on (but unless you plan to do sudden stops, don’t bother, you’ll e changing the gear in 10 min anyway)
- Put the wheel back into the drop outs.

Finishing the gear change
- Make sure the chain is all the way around the chainring and cog (Sounds stupid, but it’s easy to forget when doing a rush change. Take your time, make sure the chain is on)
- Use your chain tensioners to tighten the chain. Don’t over tighten. The chain should be slightly loose
- ***If you don’t have chain tensioners this takes a bit more skill. Pull the wheel out till the chain is tight. Tighten one bolt. Then pull the wheel opposite to the bolt you tightened to either straighten or adjust the tension. Tighten that bolt. If not perfect, loosen the first one and re-tension. If you need to do more than that, get tensioners.***
- Once the chain has a good tension. Tighten the bolts (firm if you have tensioners, totally cranked if you do not)
Give the wheel a spin check the chain is right (make sure your fingers can’t end up in the drive train)
Congratulations! You changed a gear.
With practice this process will become very fast and smooth. Just keep to a routine, and have everything organized.
*** some words on yo nuts! ***
Your rear track nuts are a consumeable item. Depending on how often or how much you tighten them they will wear out faster or slower.
Make sure you keep them oiled for a longer life.
If you have issues getting your rear wheel off try these ideas, in this order
- Replace your nuts
- Clean your axel
- Get the threads re cut on your axel
- Replace everything and buy new drop outs
- Get new wheels
- Get a new bike
